
It is important to back up the data before you run into a problem and lose your important data. If you own a mid or small-sized business and use QuickBooks Desktop for your bookkeeping and accounting needs, the following process can help you make a backup of your QuickBooks Desktop company file. Creating a backup of your company file can save you from sudden data loss. In case of accidental loss of data, these backup copies act as insurance. You can utilize them to restore a backup company file.
Read on to learn how you can make a backup of your QuickBooks Desktop company file. Or you can also get in touch with our support team through our toll-free number i.e. +1-855-999-0211. Call us and let your accounting professionals make a backup of the company file on your behalf. Our QuickBooks specialists will be happy to assist you.
Various Steps to back up your QuickBooks desktop company file
Backing up the company file saves everything in the company file. This can include all accounting data, templates, letters, logos, pictures and related files (QuickBooks statement writer, cash flow projector, business planner and loan manager). It should be noted, however, that the payroll form is not meant to be saved. The user can backup data automatically or manually. Below, we will discuss the ways in which users can create a backup company file.
Step 1: Schedule Automatic Backup in QuickBooks
The following steps to backup company files are as follows:
- The first step is to switch the File and Switch to Single-User Mode.

- And then, go to the QuickBooks File menu, choose a Backup Company, and then Create a Local Backup.
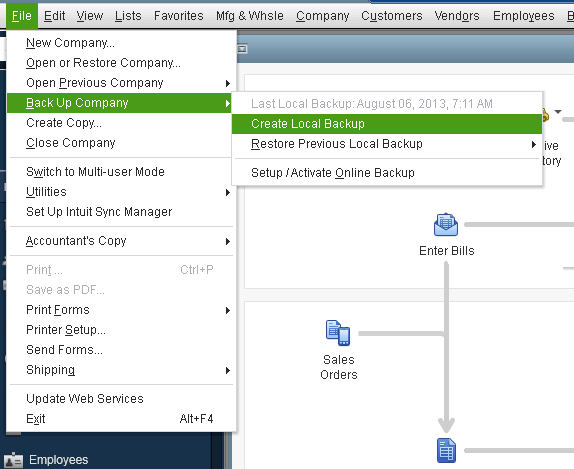
- Once you create a Backup Window on your screen, click on the Local Backup Advertisement option.
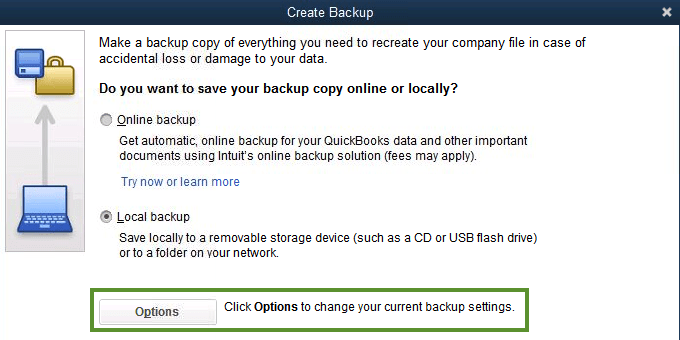
- After the Backup Options window pops up on your screen, click Browse and choose a location to store the backup copy.
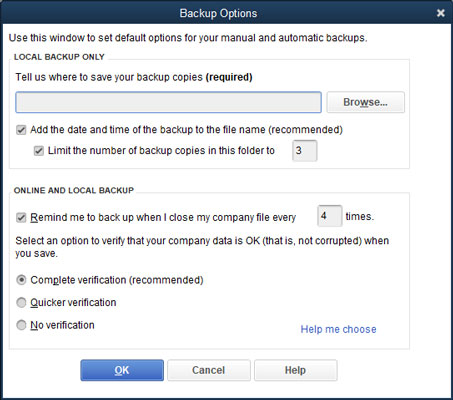
- After selecting the location, the user has to click on the OK button.
- On the current page, the user also needs to check other options. And then choose the Option that you like. Every option is explained further on this page. When done, press OK.
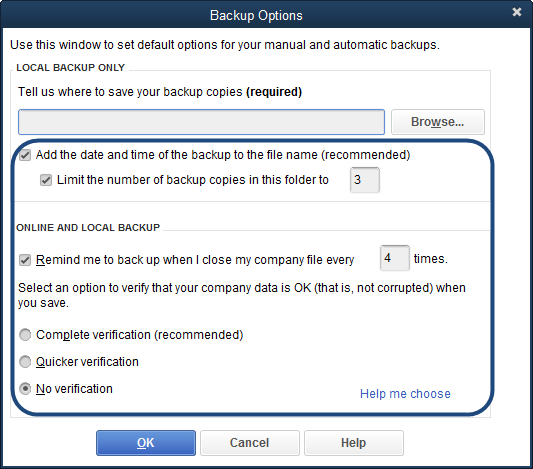
- Locate and make a note of the date and time of the file backup to determine the files. You can use the checkbox to limit the number of backup copies and enter a number to cap the number of backups created for each company. This process can greatly help you save space in the hard drive.
- Click the checkbox to remind me that every time I close my company file and if you want to get a reminder to make a backup, set a frequency.
- Always click Options to validate data before saving changes. Skipping this step can speed up the backup process, but it is advisable to enable it so that you get an alert when damage is detected in the file. The following are your options:
Complete verification (Recommended)
Quicker verification
No verification
- The next step is to click on Next after creating a backup window pop-up.
- And then, whether to save your backup now, schedule future backups or both.
- If you choose your backup now – you will be prompted to choose a location for your backup file. The backup file will be saved in the location you specify. However, you may also have the option to choose a different location. Next, select Save to create a backup file.
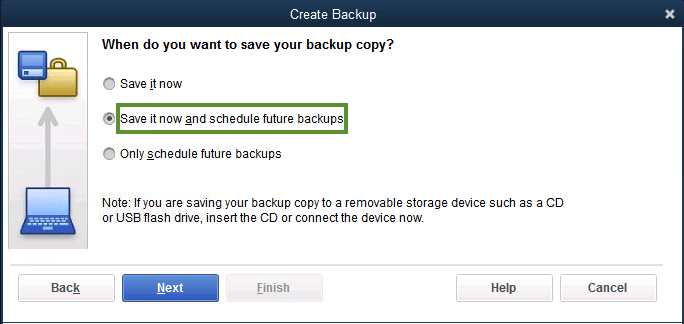
- If I save it now and schedule a future backup or only a later schedule to save the file backup when you close your file, then when I close my company’s file box, automatically Click the Save the backup checkbox. You can also decide the frequency of closing QuickBooks before you are prompted to create a backup.
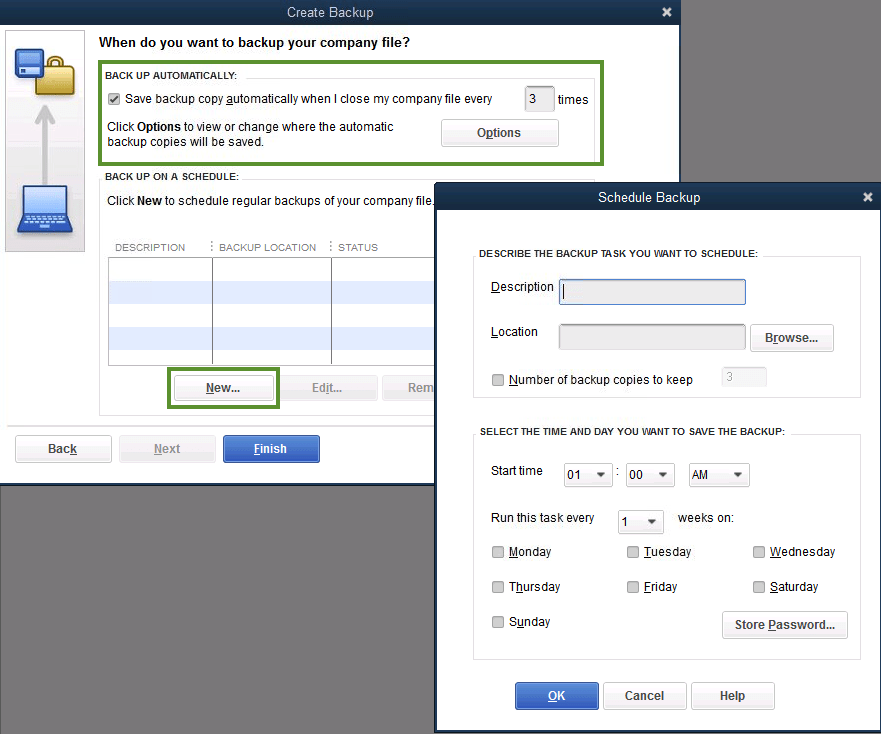
- To save a backup of a QuickBooks company file at a set time, click New to set a backup schedule. You can also choose to detail your schedule, specify a location to backup, and set the day and time when you want to backup.
- Formerly the process is over, click OK and then Finish.
QuickBooks will generate a backup and schedule your future backups at the same time.
Step 2: Manually backing up the company file
If the user is comfortable with manually backing up the company file, in that case the following steps can be taken.
- To get started, go to the File menu in QuickBooks, and then choose Single-User Mode.

- After that, go to the File menu once again and then go to the backup company. In addition, select the option of Create Local Backup.

- The next step is to select the local backup option in the window and then press Next.
- Moving forward, the user must click Browse in the Local Backup Only section, followed by selecting the location to save the backup company file.
- After that, determine the number of backups that the user can keep. It should be well known that this step is not a compulsion.
- The user is recommended to set a backup reminder using the Options in the Online and Local Backup section.
- Now, the user needs to run a test to ensure that the backup file is in good condition before saving.
- And then, press to click on the OK button.
- The user then needs to choose the Save it now option, with the next option next.
Steps to adjust backup settings in QuickBooks
If the user wants to find out when he has backed up the company file, in that case, go to the File menu and then the Back Up Company option. Thereafter, the user will see the time and date at the top of the menu.
If the user wants to change backup preferences, the steps below may work well:
- First, select the File and go to the backup company. Then proceed to click on Create Local Backup.
- The upcoming step is to select Options.
- And to finish the process the user needs to make changes and hit the OK button.
Steps to restore backup settings in QuickBooks
Now that the user has a backup of the company file, the user can use QuickBooks to restore the company file. It should be noted that this file has a .qbb extension at the end of the filename. The point to note here is that if the user places the backup company’s files on an external device or hosting service like Box, the user will need to move them to a local hard drive before restoring.
Conclusive Line!!
We hope you find this article informative and will be helpful in making a back of your QuickBooks Desktop company file. If you need any assistance, you can reach us at our toll-free number i.e. +1-855-999-0211.
Our QuickBooks Support team will handle all your problems in no time. Calling us will help relieve all types of questions related to QB, as our team of experts and certified accounting professionals work round the clock to provide the best possible services.